
Quick Summary
Ring die problems do not always begin where the symptoms first appear.
Sometimes the root cause truly starts in the die itself. In other cases, the die is only the first place where a wider system problem becomes visible.
That distinction matters in real production. If it is judged incorrectly, the team may replace the die, adjust the roller, or change operating settings without solving the actual problem.
This article is written for operators, maintenance teams, supervisors, and pellet plant managers. Its purpose is not to defend the die or blame it too quickly. Its purpose is to help narrow down whether a ring die symptom is caused by the die itself or by a problem developing elsewhere in the pelleting system.
This way of thinking is not limited to one pellet sector. It can be useful across ring die applications, including feed pelleting, wood pellet production, and other biomass pelleting processes, even though raw materials, friction behavior, and process details are not the same.
If you are already facing a similar problem, you can also share your machine model, die specification, pellet application, raw material type, and photos with us for a first discussion. In many cases, the right diagnosis is the first real solution.
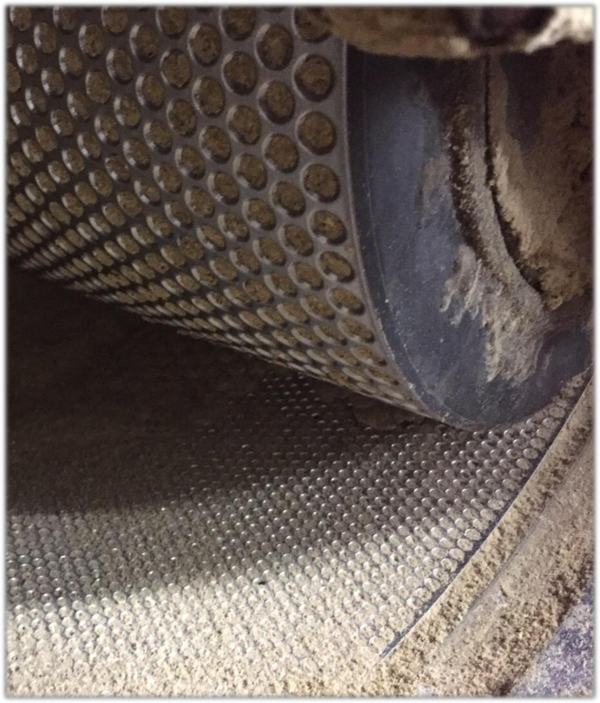
Table Of Contents
- Why I Wrote This Article
- Why I Do Not Like to Judge a Ring Die Too Quickly
- Primary Die Problems vs System-Expressed Problems
- A Practical Four-Step Diagnostic Method
- Step 1 – Observe What the Die and Pellets Are Showing
- Step 2 – Listen to What the Machine Is Telling You
- Step 3 – Ask What Changed Before the Symptom Appeared
- Step 4 – Check Both the Die Itself and the Wider System
- How This Method Helps Operators and Maintenance Teams
- Practical First-Check Priority on Site
- Common Misjudgments I Often See
- What to Share for a Faster First Diagnosis
- FAQ
- My Final View After Years in This Field
- Need Help Narrowing Down a Ring Die Problem?
Why I Wrote This Article
This article comes from more than 20 years of spare parts work and many years of visiting pellet plants and discussing ring die problems with customers.
In many cases, a customer sends only a few photos or a short video and asks a simple question:
“Can you help judge whether this ring die has a problem?”
Over time, I found that the visible symptom on the die was often only part of the story.
Poor pellets, abnormal wear marks, blocked holes, uneven discharge, or an early crack may look like direct die problems at first. But in many cases, the photos or videos also point to something deeper in the wider system, such as roller setting, material condition, process instability, assembly condition, or machine-related issues.
That is one reason I wanted to write this article.
I wanted to record some of the practical thinking that has developed through years of real customer cases, not as a final answer to every ring die problem, but as a way to help operators, maintenance teams, and plant managers make a more careful first judgment on site.
If this experience helps people reduce misjudgment, ask better questions, and narrow down the real cause earlier, then I believe it is worth sharing.
Why I Do Not Like to Judge a Ring Die Too Quickly
Many ring die problems are judged too quickly.
A team may see rough pellets, blocked holes, abnormal wear, uneven discharge, overheating signs, or an early crack and immediately conclude that the die is the problem. Sometimes that conclusion is correct. Sometimes it is not.
What matters is not only what the symptom is, but also where the problem truly begins.
A rough pellet surface may look like a die problem, while the real cause may be unstable raw material preparation, moisture variation, or process instability.
An early crack may appear to prove a material or heat treatment issue, while machine runout, assembly condition, local stress concentration, or abnormal loading may also be involved.
Uneven discharge may seem to point directly to hole condition, while roller setting, feed distribution, or unstable material flow may actually be contributing.
Of course, the opposite is also true. Sometimes the root cause really is in the die itself, and that should be acknowledged honestly.
That is why I prefer diagnosis over assumption.
Not to defend the die.
Not to blame the die too quickly.
But to understand the problem more objectively.
A visible symptom is useful, but it is not the same as a confirmed root cause.
Primary Die Problems vs System-Expressed Problems
One reason ring die troubleshooting becomes confusing is that people often mix up where the symptom appears with where the problem begins.
Although operating details differ from one pellet application to another, the diagnostic logic is often similar: a symptom visible on the ring die may either begin in the die itself or be expressed there after developing elsewhere in the system.
Primary die problems
These are problems that truly start in the ring die itself.
Examples include:
- unsuitable die material for the application
- heat treatment inconsistency
- poor hole finish
- compression ratio mismatch
- relief design problems
- dimensional inaccuracy
- local structural weakness
- die-related causes of premature cracking
System-expressed problems
These are problems that become visible on the die, but do not necessarily begin there.
Examples include:
- raw material variation
- unstable moisture condition
- particle size variation
- poor material preparation
- process instability before pelleting
- poor post-pellet cooling
- roller gap issues
- poor roller-to-die matching
- machine runout
- locating surface wear
- assembly problems
- incorrect start-up or operating habits
Quick comparison table
| Type of Problem | Typical Source | What You May See on the Die | Example Next Check |
|---|---|---|---|
| Primary die problem | Material, heat treatment, hole finish, design | Early crack, abnormal wear, poor hole performance, local damage | Check die material, hardness, hole geometry, crack origin |
| System-expressed problem | Raw material, moisture, particle size, process condition, roller gap, machine condition | Uneven discharge, scratches, overheating signs, unstable pellets, dust or fines | Check process data, roller setting, machine runout, recent material changes |
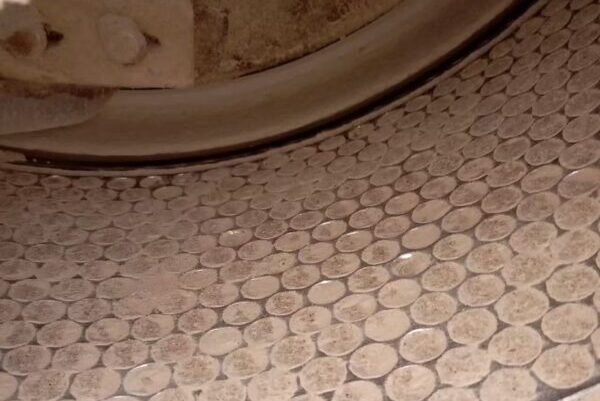
Primary die problem: the issue truly begins in the die itself. |
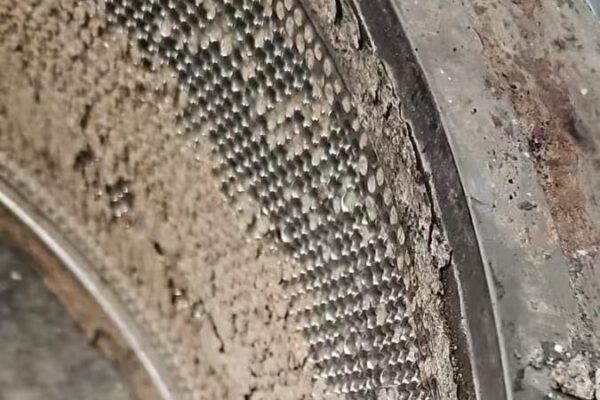
System-expressed problem: the symptom appears on the die. |
- Some problems truly begin in the die itself, while others only become visible there after developing elsewhere in the system.*
A Practical Four-Step Diagnostic Method
This is the method I prefer on site:
- Observe what is visible
- Listen to what is changing
- Ask what changed before the symptom appeared
- Check both the die itself and the wider system
This is not a laboratory method. It is a practical screening method for real production.
It does not replace deeper technical analysis, but it helps operators and maintenance teams avoid one of the most common mistakes in troubleshooting:
treating the first visible symptom as the final answer.
Step 1 – Observe What the Die and Pellets Are Showing
Observation is where most useful diagnosis begins.
Before explaining the problem, I want to see what the pellets and the die are already showing.
What I look for in the pellets
- uneven pellet length
- cracks
- scratches
- black spots
- rough surfaces
- unstable color or texture
- excessive fines or dust
- poor pellet integrity
- signs of burn marks or overheating
What I look for on the die
- uneven discharge
- blocked holes
- local polishing marks
- inlet impact marks
- unusual wear zones
- local discoloration
- overheating signs
- early crack lines
- wear patterns that do not look normal
What visible symptoms may suggest
| What I See | Possible Die-Related Cause | Possible System-Related Cause |
|---|---|---|
| Poor pellet surface or rough finish | Hole finish, compression ratio mismatch, die wear | Raw material variation, unstable moisture, process instability |
| Early crack line | Material, heat treatment, local stress concentration | Runout, misalignment, assembly stress, abnormal load |
| Uneven discharge | Hole condition, local wear | Feed distribution, material flow instability, roller setting |
| Excessive fines or dust | Hole design, die wear | Cooling issue, raw material behavior, unstable operation |
| Burn marks or overheating signs | Local friction, design mismatch, abnormal hole condition | Excessive load, poor material flow, roller pressure, moisture imbalance |
What matters in practice
A symptom is more useful when its position, timing, and pattern are clear.
For example:
- Did the abnormal discharge appear across the full working width, or only in one local zone?
- Did the crack appear soon after installation, or after a period of operation?
- Did the rough pellet surface appear suddenly, or did it gradually worsen?
- Are the wear marks evenly distributed, or concentrated in one area?
These details often matter more than the symptom name itself.
In feed pelleting, I may pay closer attention to pellet surface, fines, and consistency.
In wood pellet production and other biomass pelleting applications, I may also pay closer attention to crack tendency, dust level, burn marks, friction-related discoloration, and signs of abnormal heat buildup.
|
Normal Pellets
Normal pellet appearance with bright color. |
Abnormal Pellets
Abnormal pellet appearance may show black color. |
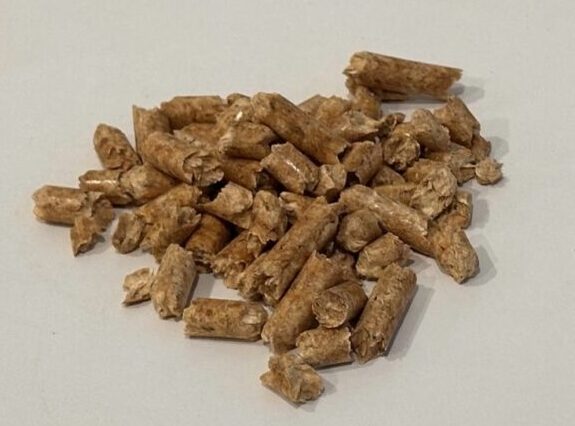
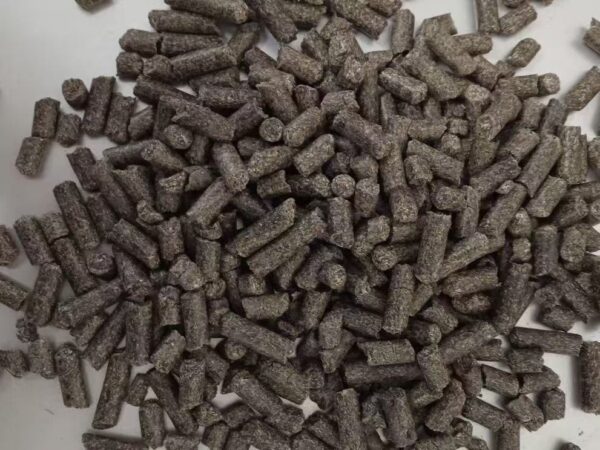
- Color,Cracks, scratches, dust, rough surfaces, or burn marks often provide the first useful direction for diagnosis.*
|
Normal Die Face
More even discharge pattern with fewer visible blockage or abnormal wear signs. |
Abnormal Die Face
Abnormal signs may include uneven discharge, blocked holes, local wear zones. |
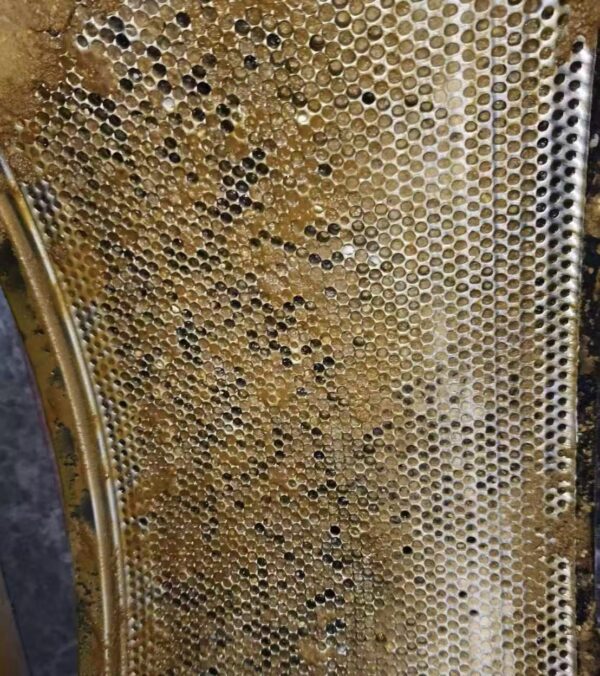
- Uneven discharge, blocked holes, and local wear patterns can suggest either a die-side problem or a wider system imbalance.*
|
Correct Assembly
Correct assembly helps maintain a more even pellet surface and discharge condition. |
Abnormal Assembly
A local wear pattern may suggest abnormal contact or a wider system-related issue. |
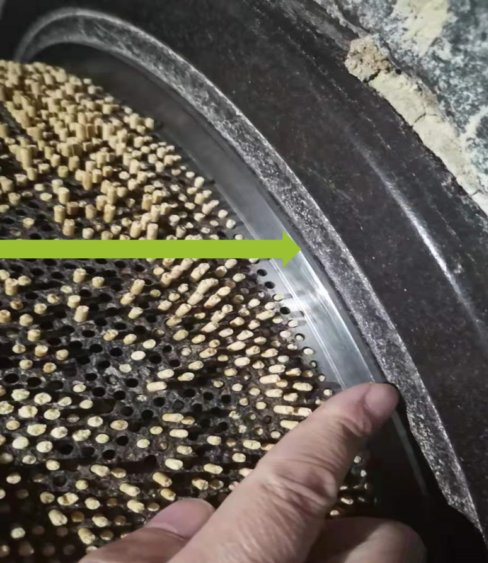
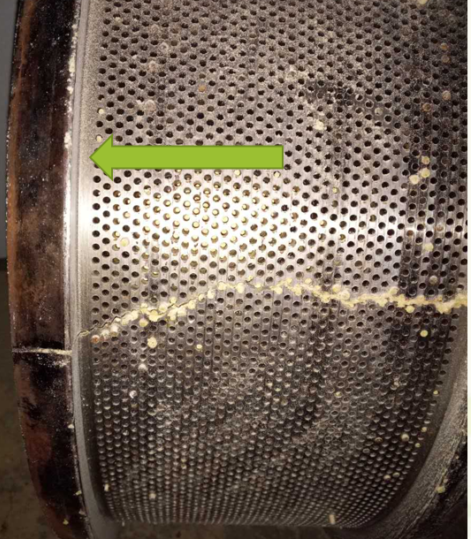
- A crack or local wear mark is a symptom. Where it appears and how it develops often matter more than the fact that it exists.*
A clear photo of the pellets and a clear photo of the die face often provide the first real clue.
What pellet appearance may be telling you
Step 2 – Listen to What the Machine Is Telling You
Some problems are heard before they are clearly seen.
A ring die problem is not always first noticed on the pellet or die face. Sometimes the machine gives an earlier warning through sound, vibration, smell, or heat.
Experienced operators often notice this first.
What I listen for
- sharper running sound
- repeated knocking
- unstable vibration
- friction noise
- unusual heat-related smell
- burnt odor near the die area
These signs do not automatically prove a die defect. But they are important warning signals.
A repeated knocking sound may suggest abnormal contact, local interference, instability, or assembly-related issues.
Friction noise may raise questions about roller setting, contact condition, or misalignment.
Heat and smell may suggest overload, poor material flow, excessive friction, or abnormal local stress.
What makes these signs more useful
These signals become much more meaningful when they appear together with other changes, such as:
- unstable discharge
- rising motor load
- local overheating
- sudden pellet quality change
- recent roller adjustment
- abnormal start-up behavior
For example, if a machine begins to show repeated knocking after a die change, that should not be judged as a die material problem too quickly. Roller setting, assembly fit, contact condition, and local interference may need to be checked first.
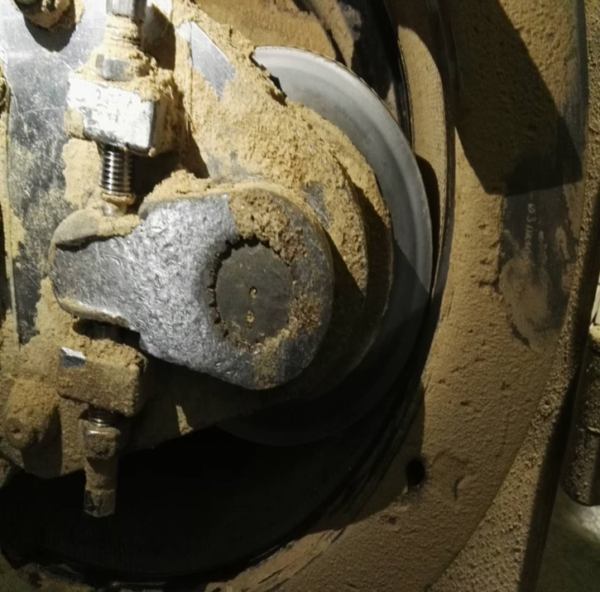
Abnormal sound, vibration, friction, or overheating often begins in the working contact zone between the die and roller.
Sound and heat can tell us that something is wrong, but they still do not prove where the problem began.
Step 3 – Ask What Changed Before the Symptom Appeared
Good troubleshooting usually begins with better questions, not faster conclusions.
A single photo can be useful.
A single complaint can also be useful.
But neither is enough on its own.
Before I make a serious judgment, I want to understand what changed before the symptom appeared.
Questions about the material
- Did the raw material, formulation, or input mix change?
- Did the moisture level change?
- Did particle size distribution change?
- Did fiber behavior or flow behavior change?
- Was any oil, binder, or additive adjusted?
Questions about the process
- What are the temperature and moisture conditions before pelleting?
- Is material preparation stable?
- Is the process stable?
- Is post-pellet cooling performing normally?
- Was the roller changed or adjusted recently?
- Is this a new die or a used die?
- Did the symptom appear immediately after installation or later?
- Have similar symptoms appeared with other dies?
- Did anything unusual happen during start-up or operation?
Why these questions matter
| Question Area | Why It Matters | Applies To |
|---|---|---|
| Raw material or formulation change | Material behavior may have changed | Feed and biomass |
| Moisture and temperature condition | Friction, flow, and pellet quality may change | Feed and biomass |
| Particle size variation | Affects compression, flow, and die load | Feed and biomass |
| Roller adjustment | Contact condition strongly affects the die | Feed and biomass |
| Post-pellet cooling | Influences durability, fines, or dust level | Feed and biomass |
| Timing of symptom appearance | Helps distinguish installation issue from process issue | Feed and biomass |
Timing is especially important
In many cases, one of the most useful questions is this:
Did the symptom appear immediately after installation, or did it develop after a period of operation?
That difference can change the first direction of diagnosis.
- If the problem appears immediately after installing a new die, first checks may need to focus on assembly condition, roller setting, raw material suitability, and start-up method.
- If the problem appears after a period of stable running, first checks may need to focus more on wear progression, raw material variation, roller condition, cooling, and process stability.
In many cases, the wrong conclusion starts with the wrong question.
The questions I always ask before judging a ring die problem
Step 4 – Check Both the Die Itself and the Wider System
This is where diagnosis becomes more accurate, or more biased.
A common mistake is to check only one side.
Some teams inspect only the die and ignore the rest of the pelleting system. Others assume the die is innocent and look everywhere else first. Neither approach is reliable.
I prefer to check both.
Check the die itself
On the die side, I may check:
- material suitability
- heat treatment consistency
- hardness behavior
- hole finish quality
- hole geometry
- compression ratio
- effective working length
- relief design
- dimensional accuracy
- crack origin and crack path
- wear pattern characteristics
Check the wider system
On the system side, I may check:
- raw material behavior
- moisture condition
- particle size distribution
- material preparation stability
- post-pellet cooling
- roller-to-die matching
- roller gap
- machine runout
- contact and assembly surfaces
- locating surface wear
- operating practice
- start-up and shutdown habits
Die-side check vs system-side check
| Check Direction | What I Review | Why It Matters |
|---|---|---|
| Die itself | Material, heat treatment, hole quality, geometry, crack origin, wear pattern | Helps confirm whether the issue truly starts in the die |
| Wider system | Raw material, moisture, particle size, process stability, roller setting, runout, assembly, operation | Helps identify whether the die is showing a problem that began elsewhere |
Two practical examples
Case 1: A new die shows local poor discharge soon after installation
Do not jump directly to a hole machining conclusion. First review assembly fit, roller adjustment, start-up condition, raw material state, and whether the symptom is local or full-width.
Case 2: Pellets become rough and fines increase after stable operation
Do not look only at die wear. Also review moisture variation, particle size shift, roller condition, cooling performance, and whether the change was gradual or sudden.
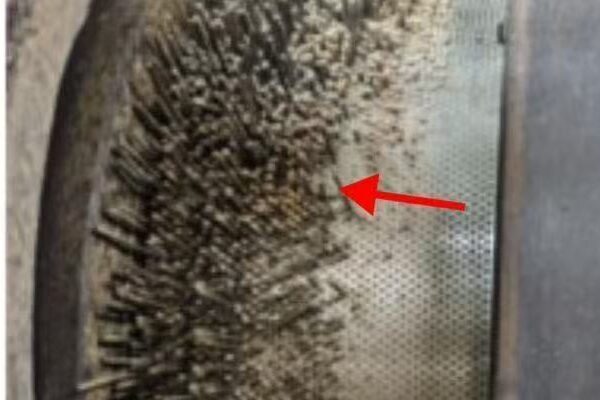
- Hole finish, crack origin, and local wear pattern often help confirm whether the issue begins in the die itself.*
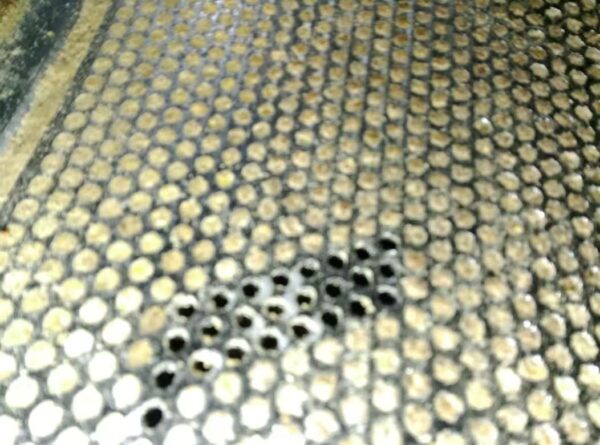
A ring die may show the symptom, while the real cause may lie in roller contact, runout, assembly condition, or locating surface wear.
Only after both sides are reviewed do I feel comfortable discussing the true root cause.
Because a ring die can be both:
- the place where a real primary defect begins
- the place where a wider system problem finally becomes visible
If we do not check both the die and the wider system, we may solve the wrong problem for the wrong reason.
If your team is already trying to judge whether the issue starts in the die itself or elsewhere in the system, feel free to contact us with photos and operating details. In many cases, narrowing down the cause is the first real step toward solving it.
How I check whether the root cause is in the die or in the system
How This Method Helps Operators and Maintenance Teams
One reason I wanted to write this article is simple:
I do not believe troubleshooting should remain only in the hands of suppliers or senior engineers.
I believe operators, maintenance teams, supervisors, and plant managers can all benefit from a clearer first-line way of thinking.
I do not use observe, listen, ask, and check as a slogan.
I use it as a practical screening method on site.
What this method helps people do
-
Notice abnormal signs earlier
Operators are often the first people to see, hear, or feel that something is changing. -
Reduce wrong judgments
A visible symptom should not automatically become a final conclusion. -
Decide what to check next
Troubleshooting becomes more efficient when the next step is clearer. -
Communicate problems more clearly
A team can discuss the problem more effectively when they separate visible symptoms from likely root-cause direction.
Practical summary table
| Step | What I Focus On | What It May Suggest | Who Can Use It |
|---|---|---|---|
| Observe | Pellets, die face, discharge, wear, cracks, dust, burn marks | Visible clues from a die issue or system instability | Operators, technicians, supervisors |
| Listen | Sound, vibration, smell, heat | Early warning of friction, imbalance, interference, or overload | Operators, maintenance teams |
| Ask | Raw material, moisture, particle size, process changes, roller changes, timing of symptom | Background that helps narrow likely causes | Technicians, supervisors, managers |
| Check | Die itself and wider system | More objective root cause confirmation | Engineers, suppliers, maintenance teams |
Of course, this method does not replace detailed technical analysis, testing, or deeper inspection.
But in real production, many mistakes happen much earlier than that.
They happen when:
- people jump to conclusions too fast
- one symptom is treated as the whole answer
- the die is blamed without enough evidence
- or the die is defended without enough evidence
That is where this framework helps.
In many cases, one clear photo of the die face and one clear photo of the pellets already help narrow the direction of diagnosis significantly.
Practical First-Check Priority on Site
For daily work, troubleshooting becomes easier when the first checks are prioritized.
If the symptom appears immediately after installing a new die
Start by checking:
- assembly and locating surfaces
- roller gap and contact condition
- raw material condition and start-up method
- whether the abnormality is local or full-width
- then review die design, hole condition, material, or heat treatment if needed
If the symptom appears after a period of stable operation
Start by checking:
- recent raw material or formulation changes
- moisture and particle size variation
- roller wear and roller-to-die matching
- cooling and process stability
- then review die wear progression, fatigue, crack development, or local damage
Why this matters
This kind of first-check priority does not guarantee a final answer. But it helps reduce wasted time and prevents teams from replacing parts or making adjustments too early.
Common Misjudgments I Often See
If there is one point worth remembering, it is this:
The symptom and the root cause are not always in the same place.
Over the years, I have seen some repeated patterns of misjudgment.
“Poor pellets must mean the die is bad.”
Sometimes yes.
But sometimes the real cause lies in raw material behavior, process instability, moisture condition, cooling, or operating variation.
“Early cracking must mean the material or heat treatment is wrong.”
Possibly.
But contact condition, runout, misalignment, assembly stress, or local stress concentration may also need to be checked.
“Uneven discharge must mean hole machining is the problem.”
It may.
But material flow, roller condition, feed distribution, or system balance may also be contributing.
“If the symptom shows on the die, the die must be the cause.”
Not always.
The die may be the first visible messenger, not always the original source.
Two important reminders
- A single photo of the die face can help identify abnormal appearance, but usually cannot confirm the full root cause by itself.
- The presence of a crack does not automatically prove a die material or heat treatment problem without checking the crack origin, operating condition, and surrounding system factors.
That is why I prefer to slow down and diagnose step by step.
What to Share for a Faster First Diagnosis
If you want support on a ring die problem, clear information helps a lot.
Recommended first-diagnosis information
| What to Share | Why It Helps |
|---|---|
| Machine model | Helps understand die size, structure, and running condition |
| Die specification | Helps review hole size, compression ratio, and design fit |
| Pellet application | Helps understand the production target |
| Raw material type or formulation background | Helps judge whether the application matches the die |
| Photos of pellets | Helps identify cracks, scratches, fines, dust, rough surfaces, or burn marks |
| Photos of die face | Helps review discharge pattern, wear, blockage, crack signs, or abnormal marks |
| Close-up photos of the abnormal area | Helps judge local wear, crack path, overheating signs, or impact marks |
| Description of when the problem started | Helps distinguish installation-related issues from wear or process-related changes |
| Recent material or process changes | Helps identify whether the root cause may be system-related |
| Roller condition or recent roller adjustment | Helps review contact-related effects |
| If available: load, temperature, or moisture trend | Helps connect the symptom to operating changes |
A practical checklist you can send
For a faster first discussion, it is helpful to send:
- machine model
- die specification
- pellet application
- raw material type
- when the symptom started
- whether it appeared immediately or gradually
- what the symptom looks like in production
- pellet photos
- die face photos
- close-up photos of the abnormal area
- any recent material, roller, or process changes
Why this matters
Sometimes one quick replacement solves nothing.
Sometimes one clear diagnosis saves much more time.
If you are producing feed pellets, wood pellets, or other biomass pellets and are facing abnormal wear, blocked holes, poor pellet quality, excessive fines or dust, uneven discharge, overheating signs, or early cracking, feel free to send us your machine model, die specification, symptom description, and photos. We may be able to help you narrow down the real cause more quickly.
FAQ
Can a ring die problem truly come from the die itself?
Yes. Problems such as unsuitable material, heat treatment inconsistency, poor hole finish, hole geometry issues, or design mismatch can truly originate in the die itself.
Can symptoms appear on the die even when the root cause is elsewhere?
Yes. Raw material variation, moisture instability, particle size changes, process condition, roller setting, machine condition, and assembly issues can all create symptoms that show up on the die.
Does poor pellet appearance always mean the die is bad?
No. Pellet appearance can be affected by the die, but also by raw materials, process stability, cooling, and operating condition.
Is early cracking always caused by material or heat treatment?
Not always. Material and heat treatment are important possibilities, but runout, misalignment, assembly stress, and local contact condition may also contribute.
If a new die shows abnormal performance immediately, what should be checked first?
Start with assembly fit, locating surfaces, roller setting, contact condition, raw material state, and start-up method before jumping to a die manufacturing conclusion.
If the symptom appears only after a period of stable running, what should be checked first?
Review recent raw material changes, moisture variation, roller condition, cooling performance, and process stability before concluding that the die itself is the only cause.
Does this troubleshooting logic apply only to feed pellet ring dies?
No. The same diagnostic logic can also be used in wood pellet production and other biomass pelleting applications. While raw materials, friction behavior, and process conditions differ, the same basic question still matters: does the problem truly begin in the die itself, or is it only becoming visible there after developing elsewhere in the system?
My Final View After Years in This Field
The longer I work in this field, the more I believe that good troubleshooting is not about protecting a conclusion.
It is about staying objective.
If the problem truly starts in the ring die itself, it should be acknowledged honestly.
If the problem comes from the wider system, that should also be acknowledged honestly.
For me, the goal is not to defend the die.
And it is not to blame the die too quickly either.
The goal is to understand where the problem truly begins, so the next decision can be more accurate.
If this way of thinking helps operators, maintenance teams, and pellet plants reduce wrong judgments and solve problems with fewer detours, then I believe it is worth sharing.
Need Help Narrowing Down a Ring Die Problem?
If you are facing problems such as:
- uneven pellets
- scratches or black spots
- excessive fines or dust
- blocked holes
- abnormal wear
- uneven discharge
- burn marks or overheating signs
- early cracking
feel free to contact us.
If you can share the following, it becomes much easier to narrow down whether the issue:
- begins primarily in the ring die itself
- is being expressed on the die after developing elsewhere in the system
What to send
- machine model
- die specification
- pellet application
- raw material type
- photos of pellets
- photos of die face
- close-up photos of the abnormal area
- a short symptom description
- recent material or process changes
Sometimes the right diagnosis is the first real solution.
A first review can often help narrow down whether the issue begins in the ring die itself or elsewhere in the system.
If you prefer a quicker first discussion, you can also contact us by WhatsApp.