
In recent years, an increasing number of my clients have consulted me about pellet appearance issues, asking whether adjustments to ring die hole design could help improve their products. Both feed pellet producers and wood pellet producers now face higher market demands than ever—their customers are no longer focused solely on price; they also pay close attention to appearance, consistency, cleanliness, and batch-to-batch stability.
In the commercial feed sector, pellets that are uneven, dusty, fragile, or inconsistent in size can quickly undermine their customers' confidence and increase the risk of complaints. In the wood pellet sector, darker color, excessive fines, broken pellets, or poor visual consistency can also affect market acceptance. Therefore, pellet appearance has become a critical component of product perception, not just a minor detail.
At the same time, they must maintain output, control costs, minimize downtime, and avoid unnecessary waste. Under these conditions, pellet appearance is more than a visual concern—it is a practical indicator of production performance.
As a ring die and roller shell supplier, my experience shows that while some pellet appearance issues can be addressed through die and roller design, others cannot be fully solved. Careful observation and analysis of pellet appearance, therefore, remain essential for optimizing production.
That is why pellet appearance deserves attention. In many cases, it is not just about visual quality. It is an early production message.
This article focuses on the most practical appearance issues observed in feed and wood pellets. Common defects are discussed together, while points requiring extra attention for wood pellets are highlighted separately at the end. The goal is to provide pellet producers with practical insights and guidance to help improve pellet quality.
Table of Contents
- Quick Summary
- Quick Reference Table: What Common Pellet Appearance Problems May Suggest
- 1. Why Are There Scratches on My Pellets?
- 2. Why Are My Pellets Pitted, Grainy, or Rough?
- 3. Why Are My Pellets Different Sizes? (Mixed Pellet Size)
- 4. Why Are My Pellets Inconsistent in Length? (Mixed Length)
- 5. Why Do Pellets Expand Larger Than the Die Hole?
- 6. Why Are My Pellets Weak and Easy to Break? (Low Durability)
- 7. What Causes High Fines and Dust in Pellets?
- 8. Why Are My Wood Pellets Turning Dark or Black?
- A Simple On-Site Reading Sequence
- Final Thought
- Need Help Reviewing an Abnormal Pellet Appearance?
Quick Summary
- Scratches, pitting, weak pellets, fines, and size variation should not be treated as one-dimensional defects.
- Similar-looking pellets can still point to very different production conditions.
- Some appearance problems are already visible at discharge, while others become much clearer after cooling, handling, or transport.
- Feed pellets and wood pellets share many common visible defects, but some wood-pellet appearance signals deserve extra attention, especially color, surface feel, and breakage after cooling.
- A healthy die-roller matching system is often one of the key foundations behind stable pellet appearance.
- Better appearance reading usually leads to faster and more useful corrective action.
Quick Reference Table: What Common Pellet Appearance Problems May Suggest
| Appearance Problem | What It Often Looks Like | Common Causes Worth Checking |
|---|---|---|
| Scratches | Surface lines, rubbing traces, drag marks | Die hole finish, local friction, roller condition, trapped hard particles |
| Pitted / Rough | Fine dots, shallow pits, grainy skin | Moisture distribution, conditioning stability, early blockage, material plasticity |
| Mixed Size | Bigger and smaller pellets in the same run | Die-roller matching, hole wear inconsistency, raw material change |
| Mixed Length | Long and short pellets together | Knife setting, uneven discharge, roller load distribution, local blockage |
| Expansion | Pellet expands after leaving the die | Material elasticity, moisture, temperature, compression ratio / relief combination |
| Low Durability | Pellets break easily, weak ends, poor PDI | Insufficient binding, unstable conditioning, unsuitable compression ratio |
| High Fines | Dusty product, broken edges | Weak pellet structure, secondary breakage, cooling stress, handling impact |
| Dark Wood Pellets | Overall darker tone or local dark pellets | High friction, heat build-up, raw material change, moisture shift, local hot spots, retention tendency, unmatched compression ratio |
Common Pellet Defects and Their Practical Causes
1. Why Are There Scratches on My Pellets?
Scratches are easy to spot but often tricky to diagnose. Don't ignore them—deep or repeated scratches often indicate abnormal friction and premature ring die wear, which directly accelerates your spare parts replacement costs.
Different scratch patterns tell different stories. Here is how to translate what you see into actionable steps:
| Scratch Type | What it looks like | What It Usually Means | Severity | Practical Check / Action |
|---|---|---|---|---|
| Point / Pit | Small isolated dots or tiny pits | Localized contact, embedded impurities, small die damage | Medium | Check raw material for hard particles; inspect die holes for micro damage |
| Vertical / Lengthwise | Long scratches along pellet length | Die wall friction, uneven discharge, surface roughness | Medium | Inspect die polishing, die wear, and discharge smoothness |
| Deep Single Scratch | One pronounced line | Local interference, die defect, concentrated friction | High | Identify affected die hole; check for burrs or damage |
| Parallel Repeated Lines | Multiple vertical lines, consistent spacing | Die surface machining marks, repeated friction | Medium | Check die surface finish; look for batch-wide consistency issues |
| Horizontal / Crosswise | Short lines across pellet width | Material blockage, cutter contact, discharge disturbance | Medium | Inspect cutter sharpness and discharge flow |
| Ring / Circular | Arc or ring-like scratches | Rotational friction, roller/die alignment, periodic contact | High | Check roller surface and die alignment; inspect machine rhythm |
| Large Area / Abrasion | Broad rough or worn patch | Extensive friction, sticky material, uneven discharge | High | Check feed smoothness, die surface, and moisture content |
| Random / Mixed | Combination of above | Multiple overlapping issues | High | Systematically check raw material, die, rollers, and operation parameters |
💡 A Field Tip to Remember:
If your new die wasn't polished perfectly during manufacturing, or if you didn't use an oily mixture to flush and protect the holes before downtime (causing internal rust), scratches will show up much earlier than expected.
What to Check First on the Machine
Instead of just looking at the pellets, head to the pellet mill and check these three specific areas:
- Inspect the Die Hole Polish: Turn off the machine and use a flashlight. Are the inner walls of the holes still mirror-smooth, or do they look dull, rusted, or heavily worn?
- Verify the Roller Condition & Gap: Grab your feeler gauge. For many ring die pellet mills, a roller-to-die gap of around 0.1–0.3 mm is commonly used as a practical reference. The exact setting should still follow the pellet mill design and operating condition. Also, check if the roller shells are wearing unevenly (e.g., becoming "bell-mouthed"). A bad gap creates uneven extrusion pressure.
- Find the Pattern: Are the scratches appearing on every pellet, or are they only coming from one specific zone on the die face? Localized scratches usually mean a localized blockage or uneven roller pressure
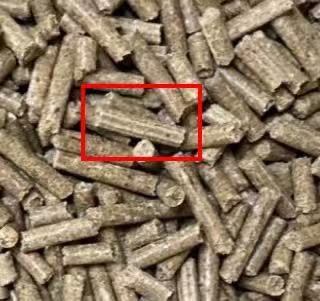
Surface scratches may look minor, but their pattern often gives useful clues about friction and discharge condition.
2. Why Are My Pellets Pitted, Grainy, or Rough?
"Pitting" is one of the most misunderstood appearance problems in pelleting. If your pellets look rough, grainy, or dotted, it’s not just a cosmetic flaw—it’s a warning sign of poor material bonding or abnormal friction. Ignoring it often leads to low Pellet Durability (PDI), high fines, and direct customer complaints upon delivery.
In practice, not all "rough" pellets are the same. Treating all pitting as a single defect will lead you in the wrong direction. You need to look closely at the surface texture to diagnose the real issue:
How to Read Different Rough Surface Patterns
| Surface Appearance | What It Looks Like | What It Usually Means | Actionable Field Check |
|---|---|---|---|
| Fine & Even Pitting | Light, shallow, and relatively uniform dots across most pellets. | An overall material formation issue, usually related to moisture distribution or plasticity. | Check your steam conditioning stability. Ensure moisture is evenly distributed before the material enters the die. |
| Deep & Irregular Pitting | Aggressive, deep marks; often feels harder or looks darker in spots. | Localized friction concentration, early-stage hole blockage, or abnormal die pressure. | Safely stop the press and inspect the die face. Look for partially blocked holes or localized material build-up. |
| Torn Skin / Grainy | Surface looks dotted, but also torn, flaky, and structurally weak. | A weak bonding structure, not just a surface defect. Often worsens after the cutter or cooler. | This is a durability issue disguised as pitting. Review your compression ratio and check if raw material binding is sufficient. |
What to Check First on the Production Line
Don't just stare at the pellets—take action on the machine and the system:
- Verify Conditioning and Moisture: For many conventional feed formulas, a conditioner outlet temperature around 75–85°C is a useful troubleshooting reference, but stability is just as important as the exact temperature.Are your steam pressure and temperature stable? Uneven moisture creates dry pockets that refuse to bind, directly causing surface graininess.
- Inspect Die Hole Release Performance: Is the material releasing smoothly from the holes? If the holes are rough, the pellet surface gets torn as it extrudes.
- Monitor Under Load: Does the rough appearance stay stable, or does it get worse when you push the pellet mill to higher capacities? If it worsens under a heavier load, your material plasticity or die-roller matching is likely failing at high speeds.
💡 A Field Tip to Remember:
Don't confuse true "pitting" with secondary damage. Grab a handful of hot pellets directly from the discharge door before they hit the cutter or cooler. If they look smooth there but rough later, your die and conditioning are fine—the damage is happening downstream in your cooling or handling process.
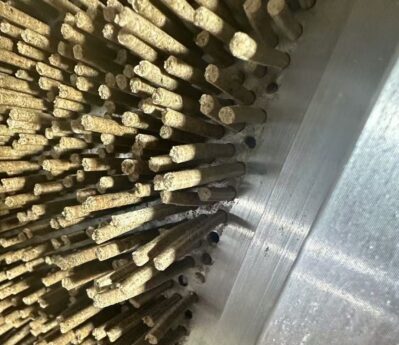
Not all “rough” pellets are the same. The details of the surface usually matter.
3. Why Are My Pellets Different Sizes? (Mixed Pellet Size)
When pellets from the same run show noticeable differences in diameter, it immediately hurts your product's visual consistency. Beyond aesthetics, mixed sizes often point to an unbalanced die-roller setup, meaning your pellet mill is likely suffering from uneven wear and wasted energy.
Uneven sizes rarely happen by magic. They occur when material extrudes through the die face at different speeds and pressures, or when material swells inconsistently after leaving the holes.
What to Check First on the Machine
- Inspect the Roller Gap: The same 0.1–0.3 mm range can be used as a field reference for many ring die pellet mills, but the key point here is whether the clearance is even across the full roller width. Is the gap consistent across the entire width of the roller? An uneven gap (e.g., tighter on the left, looser on the right) will force material through one side of the die faster, causing size variations.
- Check for Uneven Shell Wear: Look closely at your roller shells. If they are worn unevenly or look "bell-mouthed," pressure distribution will fail, directly causing thick and thin pellets.
- Examine Hole Wear Across the Die Face: In older dies, the outer rows often wear faster than the middle rows. If the working length (effective compression) varies across the die, pellet expansion will vary too.
- Monitor Moisture Stability: If your raw material moisture or conditioning steam fluctuates, the material’s elasticity changes, causing some pellets to swell more than others after discharge.
Pellet Diameter Comparison (Side-by-Side)
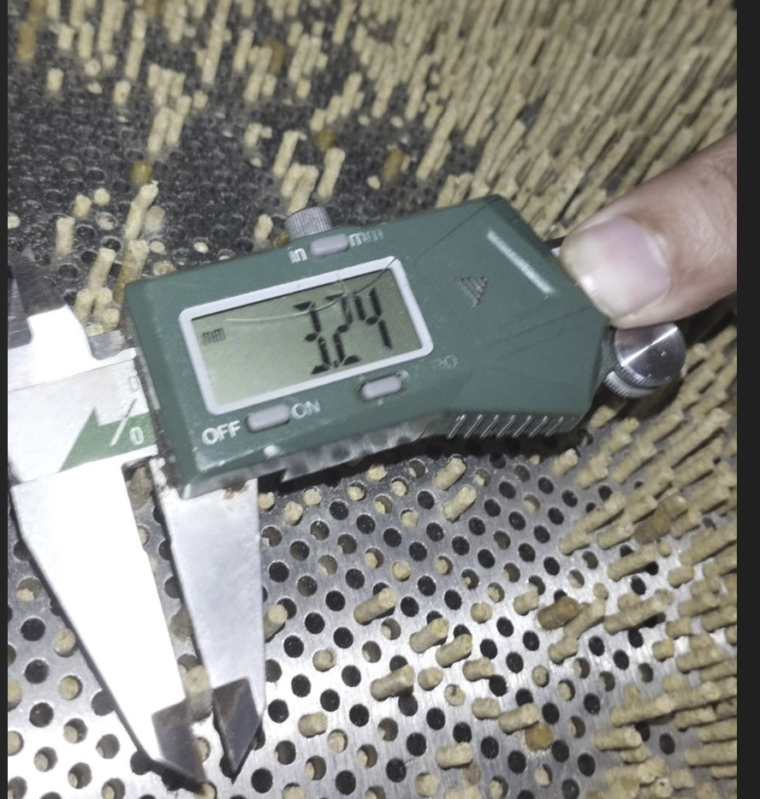
Larger and smaller pellets placed side by side under the same lighting.
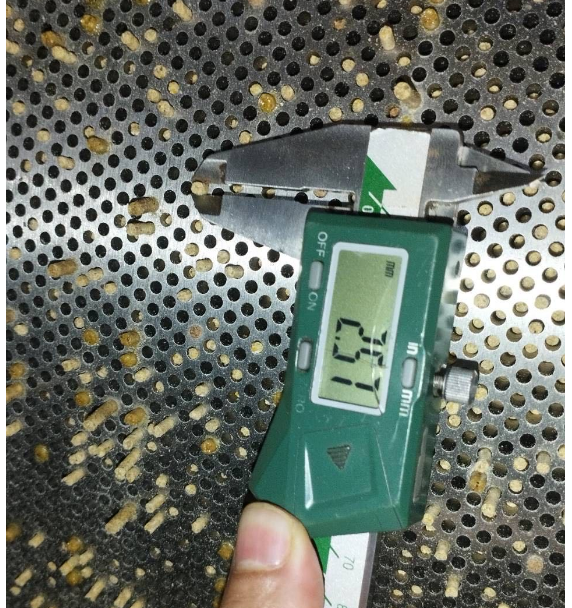
Closer view showing diameter variation within a batch of pellets.
A Field Tip to Remember:
Before blaming the die holes, always check your feeding system. If the deflector scraper in the pellet mill door isn't feeding the material evenly to all rollers, you will get uneven pressure and, consequently, uneven pellet sizes.
4. Why Are My Pellets Inconsistent in Length? (Mixed Length)
Mixed length is a common and very visible appearance complaint, especially in commercial feed. Too many short pellets usually mean more broken pieces and fines in the bag, while too many longs can block automated animal feeding systems, triggering immediate customer complaints.
Many operators first think about adjusting the knife setting, and that is a reasonable start. But length variation usually becomes severe when discharge itself is not even across the die face. If pellets are leaving the die face at different rates, the knife is simply cutting what it receives at unequal intervals.
What to Check First on the Machine
- Knife Condition and Distance: Check if the cutting edge is dull, chipped, or bent. A dull knife hacks the pellets instead of cutting them cleanly, causing shattering and length variation. Ensure the distance from the die face is uniform.
- Discharge Uniformity: Observe through the door window if one side or section of the die face is discharging significantly faster than others.
- Deflector and Scraper Setup: Ensure that the internal feed plows are distributing the mash equally to all compaction zones. If one roller gets more feed, that zone extrudes faster, leading to longer pellets before the knife hits them.
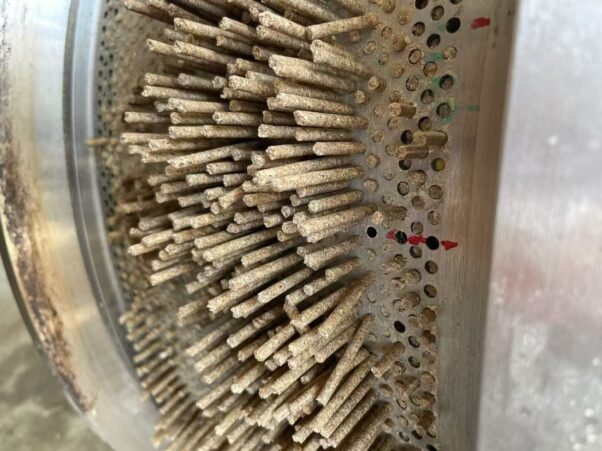
A length problem is easier to interpret when compared to a stable reference sample.
5. Why Do Pellets Expand Larger Than the Die Hole?
This is a question many customers ask sooner or later: why does the pellet come out larger than the nominal die hole diameter?
The reason is "elastic recovery" or "material swelling." The pellet does not always maintain its compressed dimension after leaving the hole. Depending on raw material behavior, temperature, moisture, and structural fiber, the pellet relaxes and expands. Excessive expansion indicates that the material wasn't densely compressed enough to overcome its natural elasticity, often leading to a soft pellet body.
What to Check First on the Production Line
- Raw Material and Formula Shifts: Have you increased the fiber content or starch profile recently? High-fiber formulas act like tiny springs, expanding rapidly when released from die compression.
- Discharge Temperature & Conditioning: Check your conditioning temperature. If the mash is too cold, the starches don't gelatinize fully. Gelatinized starch acts as a glue that seals the pellet structure and prevents it from spring-back expansion.
- Compression Ratio & Relief Combination: If expansion is unstable and causing fragile pellets, your ring die's effective compression length might be too short for the elasticity of your raw material mix. A useful reference is the L/D ratio: effective compression length divided by hole diameter. For example, a 4 mm hole with a 40 mm effective compression length gives an L/D of 10. A higher L/D generally increases resistance and pellet density, while a lower L/D reduces resistance and may increase expansion if it is too low for the material.
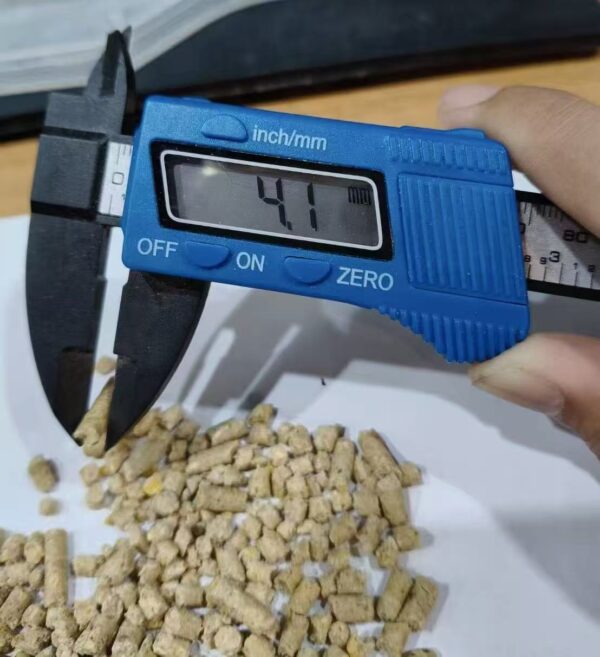
Pellet size after discharge may differ from hole size, especially when the material shows strong relaxation or swelling behavior.
6. Why Are My Pellets Weak and Easy to Break? (Low Durability)
A pellet that looks perfect but crumbles when squeezed is a failed product. Low durability (a poor Pellet Durability Index, or PDI) is a structural failure, meaning the particles are not properly bonded together. This directly leads to excessive fines during handling, bagging, and transport.
Many operators immediately blame the raw material when pellets are weak, but mechanical compression and thermal conditioning play equally critical roles. If your pellets are fragile, the issue usually lies in how the material is being prepared and squeezed.
What to Check First on the Production Line
- Conditioning Temperature and Retention Time: Are you adding enough steam? For many conventional feed formulas, conditioning around 75–85°C is a useful practical range to review when PDI is low. If the actual temperature is still around 60–70°C, it is worth checking whether the material is receiving enough steam, moisture, and retention time. Ensure the retention time in the conditioner is long enough for the moisture to penetrate to the core of the particles.
- Compression Ratio Match: If conditioning is stable but the pellets are still fragile, I would also check whether the ring die compression ratio is too low for the current formula. The material is sliding through the holes too fast without building dense, inter-particle bonds.
- Check for Early Cracking: Watch the pellets as they slide down the discharge chute. If you can already see fine horizontal or vertical micro-cracks before they even hit the cooler, it means the structural integrity is failing right inside the die hole.
7. What Causes High Fines and Dust in Pellets?
High fines are one of the most expensive problems in a pellet plant. Every ton of fines you have to re-pelletize is wasted electricity, wasted labor, and a direct hit to your tons-per-hour capacity. If the fines reach your buyer, it usually means price deductions or lost contracts.
Fines happen when the pellet's internal structure is weak (low Durability/PDI), but the exact source of the dust can be deceptive.
How to Isolate the Fines Problem
Instead of guessing, follow the flow of your production line to find exactly where the fines are being created:
- Check at the Discharge Door (Before Cooling): Grab a handful of hot pellets straight from the die. Do they already look dusty or have crumbly, weak ends? If yes, the issue is inside the press. Check your conditioning temperature (is it too low?) and verify if your die's compression ratio is high enough for your specific recipe.
- Check After the Cooler: If hot pellets look good but cooled pellets are dusty, your cooling process might be too aggressive. Rapid cooling shocks the pellets, creating micro-cracks that turn into dust.
- Inspect the Conveying Path: Are there severe drop points in your facility? Even strong pellets will break and create fines if they are dropped from too high or smashed by an aggressive bucket elevator.
💡 A Field Tip to Remember:
Always test your Pellet Durability Index (PDI) regularly. If your PDI is passing lab tests but fines are still high in the final bag, your mechanical downstream handling (screws, belts, or deep drop chutes) is physically damaging the product.
Recommended reading: Why Is PDI Good in the Plant but Poor After Transportation?
8. Why Are My Wood Pellets Turning Dark or Black?
In the wood pellet market, customers buy with their eyes first. Dark, scorched, or burnt-looking pellets immediately signal poor quality to a buyer, even if their heating value is technically fine. This can lead to entire shipments being rejected.
When pellet color suddenly becomes darker during the same production, I usually first check excessive heat, friction, moisture changes, and raw material changes. To fix it, you need to determine if the whole batch is dark, or just some of the pellets.
What to Check Based on the Color Pattern
• If the WHOLE BATCH is suddenly darker:
- Check the Moisture Level: Has your raw sawdust become significantly drier? Overly dry material creates intense friction inside the die holes, driving temperatures up and literally roasting the wood.
- Check the Compression Ratio: If you recently installed a new die, is the compression ratio too high for your current wood species? Hardwoods naturally generate more friction than softwoods and need careful ratio matching.
• If ONLY SOME PELLETS are dark or have black scorch marks:
- Check for Blocked Holes: Localized dark pellets usually mean material is moving too slowly through certain die holes, getting "baked" before finally pushing out.
- Check Local Hot Spots: Misaligned rollers or localized material build-up on the die face can create extreme friction zones.
💡 A Field Tip to Remember:
The design of the die hole's "relief" (the wider exit part of the hole) matters immensely for wood pellets. If the relief depth or angle doesn't match the expansion rate of your wood species, excessive backpressure and heat get trapped, making scorching much more likely.
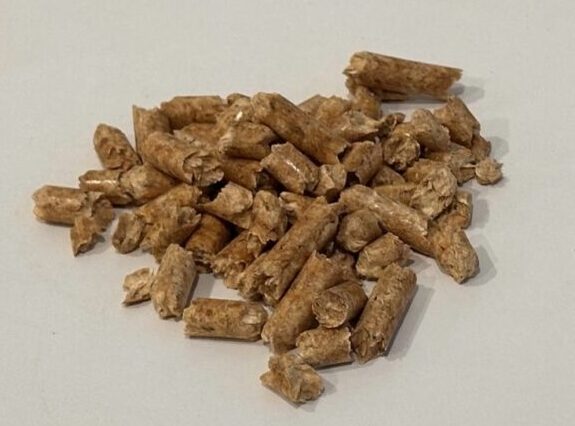
| Normal wood pellets | Darker wood pellets |
|---|---|
 |
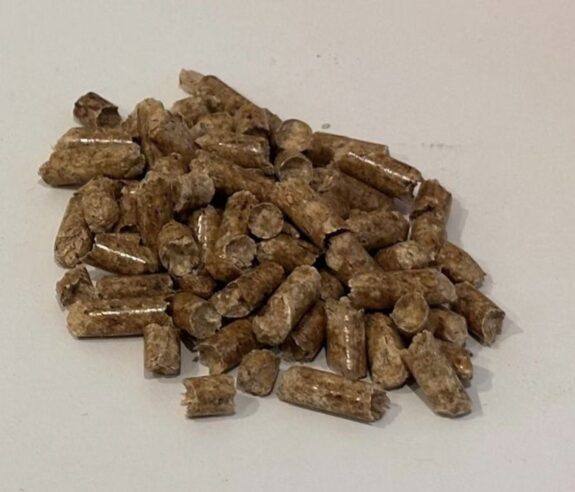 |
Color comparison is more useful when the two samples are photographed under the same light and from the same angle.
💡 Pro Tip:
Market Variations in Pellet Color While light-colored pellets are widely recognized as a hallmark of premium residential grades (such as ENplus A1), color preferences vary significantly across different marketsIn some markets, darker pellet color may still be acceptable depending on raw material type and end use. A darker hue can indicate specific wood species (like hardwoods), higher lignin content, or specific thermal drying processes that offer distinct combustion profiles and calorific values.
A Simple On-Site Reading Sequence
For operators who want a practical, repeatable first-check habit on the floor, follow this diagnostic sequence:
| Step | Core Diagnostic Question | What to Analyze / Where to Look |
|---|---|---|
| 1 | Identify the Defect | Is it a scratch, pitting, size difference, length difference, weak pellet, fines, or color change? |
| 2 | Analyze the Pattern | Is the defect uniform across the batch, localized, gradual, sudden, or load-related? |
| 3 | Check for Combinations | What other signs appear together with it? (e.g., Pitting combined with dark marks means high friction). |
| 4 | Locate the Origin | Is the issue visible directly at discharge, after the cutter, after the cooler, or after packaging? |
| 5 | Review Recent Changes | What changed recently? Check raw material batch, moisture shifts, formula changes, new dies, or roller adjustment habits. |
| 6 | Check the Numbers | Review conditioner temperature, moisture, roller gap, motor load, production capacity, PDI, and die specification. |
Final Thought
Pellet appearance is not just a cosmetic matter. It is an early production warning message written on the product itself.
The more accurately your team can read scratches, pitting, mixed sizes, low durability, fines, or wood-pellet color changes, the faster you can move from a visible complaint to a highly effective corrective action.
In many cases, changing one isolated part is not enough. Achieving a stable pellet appearance depends heavily on how well your raw material properties, conditioning steam, and ring die-roller matching mechanics work together as a unified system.
Need Help Reviewing an Abnormal Pellet Appearance?
Is your team dealing with stubborn scratches, surface pitting, excessive fines, mixed sizes, or scorched wood pellets?
Many pellet appearance problems look simple at first but become much easier to judge once we analyze the pellet photos and the die-face running condition together.
If you are facing a quality challenge, we are here to help you narrow down the root cause. Send us a clear close-up photo of your pellets, a short video of the machine discharging, and your basic production details (material type, moisture, current die specs). Our engineering team can help you review whether the issue is more likely related to the raw material, operating condition, ring die, roller shell, or downstream process.
Related Articles
- Why New Ring Dies Sometimes Block More Easily
- How Ring Die Hole Design Affects Pellet Appearance, Durability, and Capacity
- Ring Die and Roller Shell Matching: Why Good Dies Still Fail with the Wrong Roller Setup
- The Same Pellet Defect, Different Root Causes: Feed Pellets vs. Wood and Biomass Pellets